
How to Assemble a Drill: Step-by-Step Guide for Beginners
Most modern power drills do not require complicated assembly before you can use them. A new drill usually arrives with the main tool already built, while parts such as the battery, drill bit, auxiliary handle, depth stop, belt hook, or side handle may need to be installed separately.
Knowing how to assemble a drill correctly helps you avoid loose accessories, improperly installed bits, and unnecessary damage to the chuck or battery connection.
The exact setup depends on whether you have a cordless drill, corded drill, hammer drill, or drill/driver. Cordless models usually require you to charge and install the battery, while corded drills simply need the correct bit fitted before being plugged in. Larger drills may also include a removable side handle or depth gauge that needs to be positioned before drilling.
For most beginners, the most important parts of drill assembly are identifying the controls, installing the correct drill bit securely, attaching any supplied handles, setting the direction and clutch, and connecting the power source only after everything else is ready.
This guide explains the process step by step so you can set up a typical drill safely and understand what each major part does before you start drilling.
How to Assemble a Drill Step by Step
To assemble a typical drill, keep the tool disconnected from power, attach any removable handle or depth stop, install the appropriate drill bit in the chuck, adjust the clutch and direction settings, and then install the battery or connect power.
A basic drill setup usually follows these steps:
- Unpack and inspect the drill.
- Identify the main parts and controls.
- Attach the auxiliary handle if supplied.
- Install the depth gauge if needed.
- Open the chuck.
- Insert and tighten the drill bit.
- Set the forward/reverse switch.
- Adjust the clutch or drilling mode.
- Install the battery or connect power.
- Test the drill briefly before starting work.
Most drills are designed so these steps can be completed without special tools.
Identify the Main Parts of the Drill
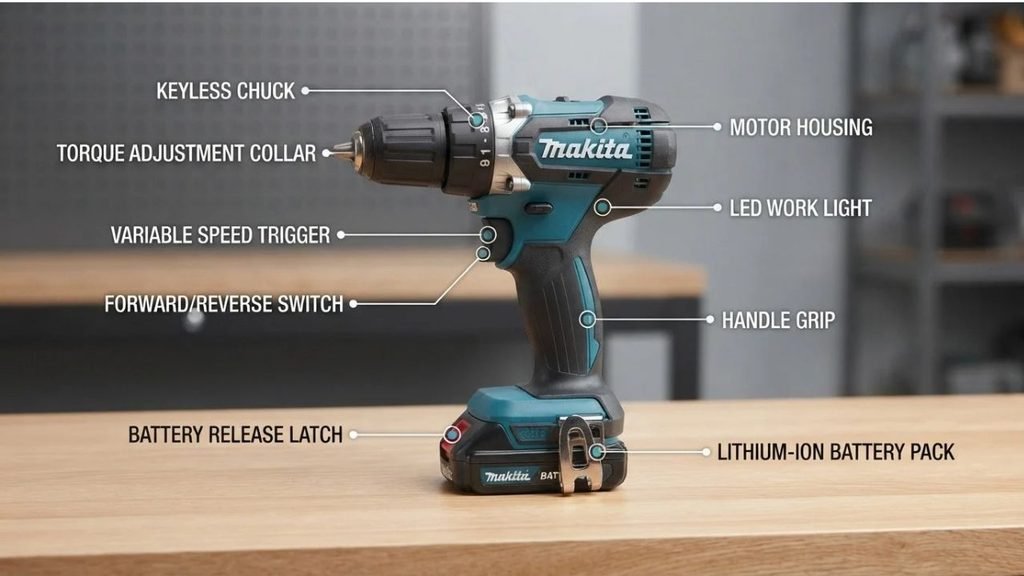
Before assembling anything, become familiar with the major components.
A standard drill or drill/driver may include:
- Chuck — holds the drill bit or driver bit.
- Trigger — controls the motor and usually the drilling speed.
- Forward/reverse switch — changes the direction of rotation.
- Clutch ring — controls how much torque is applied when driving screws.
- Mode selector — switches between drilling, screwdriving, and sometimes hammer drilling.
- Gear selector — selects a low-speed/high-torque or high-speed/lower-torque range.
- Battery connection — accepts the battery on cordless drills.
- Auxiliary handle — provides extra control on some larger drills.
- Depth stop — helps limit drilling depth.
Some compact drills will not have every one of these components.
Inspect the Drill Before Assembly
Take a moment to inspect the drill and accessories before installing anything.
Look for:
- Cracked housing
- Damaged battery
- Bent chuck
- Damaged power cord
- Missing screws
- Broken switches
- Loose components
If the drill is new, compare the contents with the manufacturer’s parts list.
Do not use a drill that has obvious electrical or structural damage.
For a cordless drill, keep the battery removed during initial assembly.
For a corded drill, leave the power cord unplugged until the drill is fully prepared.
Charge the Battery First for a Cordless Drill
If the drill is cordless, the battery may need charging before first use.
Place the battery in the correct charger and follow the manufacturer’s charging instructions.
Many modern cordless drills use lithium-ion batteries, which work with chargers specifically designed for that battery platform.
Do not use a charger simply because the voltage appears similar. Battery compatibility depends on more than voltage alone.
Once charged, leave the battery disconnected until the drill bit and accessories are installed.
Attach the Auxiliary Handle
Some drills, especially powerful hammer drills and larger cordless models, include an auxiliary side handle.
The handle gives you better control and helps resist the twisting force produced during drilling.
How to Install a Side Handle
The exact design varies, but a typical side handle attaches around the front section of the drill.
To install it:
- Loosen the handle by turning its grip or locking mechanism counterclockwise.
- Slide or position the handle around the mounting collar.
- Rotate it to a comfortable position.
- Tighten the handle securely.
Depending on your working position, the handle may be placed on the left or right side.
Make sure it cannot rotate easily before using the drill.
Install the Depth Stop
Some drills include a depth stop, also called a depth rod or depth gauge.
This accessory helps you drill holes to a consistent depth.
The rod normally slides through a hole in the auxiliary handle assembly.
To install it:
- Loosen the depth-stop clamp.
- Slide the rod through its mounting hole.
- Position the rod according to the desired hole depth.
- Tighten the clamp.
When drilling, the end of the rod eventually touches the workpiece and prevents the drill from moving farther forward.
Understand the Drill Chuck
The chuck is the part at the front of the drill that holds the drill bit.
Most modern drills use one of two designs:
Keyless Chuck
A keyless chuck can usually be opened and tightened by hand.
Turn the chuck sleeve counterclockwise to open the jaws and clockwise to tighten them.
Keyed Chuck
A keyed chuck uses a separate chuck key.
Insert the chuck key into one of the holes in the side of the chuck and turn it to open or tighten the jaws.
Always remove the chuck key before turning on the drill.
A chuck key left in the chuck can be thrown from the tool when the motor starts.
How to Install a Drill Bit
Installing the bit correctly is one of the most important parts of assembling a drill.
Keep the drill disconnected from power while doing this.
With a Keyless Chuck
To install a bit in a keyless chuck:
- Rotate the chuck sleeve counterclockwise to open the jaws.
- Open them wide enough for the bit.
- Insert the straight shank of the bit into the center of the chuck.
- Keep the bit centered between all three jaws.
- Turn the chuck clockwise until it grips the bit.
- Tighten firmly by hand.
Make sure the jaws grip the shank rather than the cutting flutes.
With a Keyed Chuck
For a keyed chuck:
- Insert the chuck key.
- Turn it to open the jaws.
- Insert the bit.
- Center the bit between the jaws.
- Tighten the chuck securely with the key.
- Remove the key before operating the drill.
If the chuck has several key positions, tightening through more than one position can help seat the bit evenly.
Make Sure the Bit Is Straight
After tightening the chuck, look at the drill bit from the side.
It should appear centered.
A badly seated bit may wobble when the drill rotates.
You can briefly run the drill at low speed after assembly to check for obvious wobble, but keep the bit pointed away from people and objects.
If the bit wobbles significantly, disconnect power, loosen the chuck, reposition the bit, and tighten it again.
Choose the Correct Drill Bit
The drill must be assembled with a bit that matches the material you are working on.
Common choices include:
- Twist drill bits for general drilling and many metals.
- Brad-point bits for clean holes in wood.
- Masonry bits for brick, concrete, and similar materials.
- Spade bits for larger holes in wood.
- Forstner bits for clean, flat-bottomed holes in wood.
- Driver bits for screws.
Using the wrong bit can produce poor results and may overheat the tool or cutting edge.
Masonry drilling may also require a drill with a hammer mode.
Set the Forward and Reverse Direction
Most drills have a switch above or near the trigger that controls rotation direction.
One setting rotates the chuck forward for normal drilling and screw installation.
The opposite setting reverses the motor and is commonly used for removing screws.
Many drills also allow this switch to rest in a center position that locks the trigger.
Keeping the switch centered while changing bits or adjusting the drill reduces the chance of accidental startup.
Set the Clutch Correctly
A drill/driver often has a numbered ring behind the chuck.
This is the adjustable clutch.
The clutch limits torque when driving screws.
Lower numbers generally cause the clutch to disengage sooner, while higher settings allow more torque.
For drilling holes, select the drilling symbol or drilling mode rather than a numbered clutch setting.
For screwdriving, start with a moderate or low clutch setting and increase it if the screw stops before reaching the desired depth.
Select the Correct Gear
Many cordless drills have a two-speed gearbox.
You may see settings such as:
1 — Low speed, high torque
Useful for screwdriving and larger drill bits.
2 — High speed, lower torque
Useful for many smaller drilling tasks.
Change gears only according to the drill manufacturer’s instructions. On many models, the motor should be fully stopped before moving the gear selector.
Select the Drilling Mode
A drill may have several operating modes.
Common symbols include:
- Screw symbol — screwdriving with clutch control.
- Drill bit symbol — normal drilling.
- Hammer symbol — hammer drilling in masonry.
For ordinary drilling in wood or metal, use normal drilling mode.
Hammer mode should generally be used only when the drill and bit are designed for masonry work.
Do not use hammer mode for ordinary screwdriving.
Install the Cordless Drill Battery
After the bit and accessories are secured, you can install the battery.
Modern cordless drills commonly use a slide-in battery.
To install it:
- Align the battery rails with the corresponding rails on the drill.
- Slide the battery into position.
- Push until you hear or feel the locking mechanism engage.
- Gently check that the battery is secure.
Do not force a battery that does not fit naturally.
If it does not slide into place, verify that it belongs to the correct battery platform and that the rails are properly aligned.
Prepare a Corded Drill
A corded drill requires fewer assembly steps.
Install the drill bit, handles, and other accessories before plugging it into the electrical outlet.
Check that:
- The cord is undamaged.
- The trigger is released.
- The direction switch is set correctly.
- The bit is secure.
- The chuck key has been removed if applicable.
Keep the power cord positioned so it cannot become wrapped around the drill bit or damaged during use.
Test the Drill Before Using It
Once the drill has been assembled, perform a brief check.
Hold the tool securely and keep the bit away from your body.
Press the trigger lightly for a moment.
Watch the bit.
It should rotate smoothly without excessive wobble.
Listen for unusual noises such as:
- Grinding
- Scraping
- Clicking
- Severe vibration
A small amount of motor noise is normal, but unusual mechanical sounds may indicate a loose or damaged component.
How to Set Up a Drill for Drilling a Hole
Once the drill itself is assembled, preparing it for a specific hole requires several additional choices.
Select:
- The correct drill bit
- Appropriate bit diameter
- Correct speed
- Drilling mode
- Proper workpiece support
Secure the material with clamps when appropriate.
For many drilling jobs, placing scrap wood beneath the workpiece can prevent damage to your work surface and reduce tear-out as the bit exits wood.
Mark the hole location clearly before beginning.
How to Set Up a Drill for Driving Screws
If you are using the drill as a driver, replace the drill bit with the correct driver bit.
Common types include Phillips, slotted, Torx, square, and hex bits.
The driver bit must fit the screw head properly.
A poorly fitting bit can slip and damage the screw head.
Select a suitable clutch setting and use low speed for better control.
Avoid immediately using maximum torque when driving small screws.
Do You Need to Assemble a New Drill Internally?
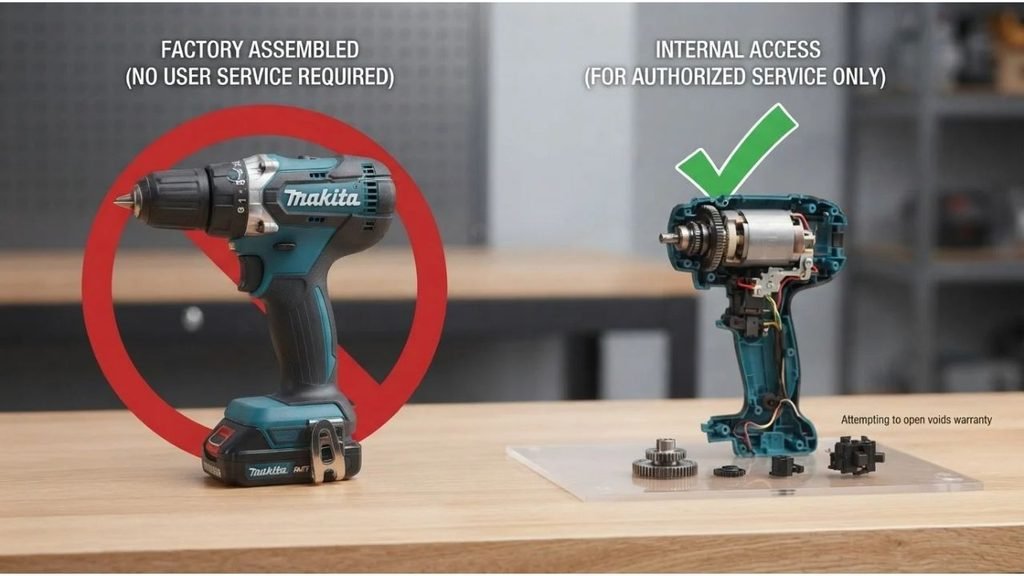
Normally, no.
A consumer drill should arrive with its motor, gearbox, chuck, trigger, wiring, and internal electronics already assembled.
You should not need to open the drill housing before first use.
Opening the housing unnecessarily can:
- Damage wiring
- Dislodge gearbox components
- Affect warranty coverage
- Create electrical hazards
- Make reassembly difficult
Internal drill assembly or repair is a different job from normal user setup and may require technical knowledge, replacement parts, and service documentation.
What if You Took a Drill Apart?
If you completely disassembled a drill for repair, reassembly becomes model-specific.
Internal components may include:
- Motor
- Gearbox
- Bearings
- Trigger switch
- Brushes on some motors
- Wiring
- Control electronics
- Cooling fan
- Chuck and spindle assembly
Their position varies significantly between manufacturers and models.
Use the correct service diagram or repair manual for the exact drill model rather than relying on a generic assembly sequence.
Incorrect wiring or gearbox installation can damage the tool.
If you are unsure how an internally disassembled drill goes back together, professional repair may be the safer option.
Common Drill Assembly Mistakes
A drill is simple to prepare, but several common mistakes can cause problems.
Installing the Bit Off-Center
If the bit is not positioned evenly between the chuck jaws, it may wobble.
Remove and reinstall it.
Leaving the Chuck Too Loose
A loose chuck can allow the drill bit to slip during use.
Tighten it securely before starting.
Forgetting the Chuck Key
Never operate a keyed drill while the chuck key remains installed.
Installing the Battery Too Early
Keeping the battery disconnected while adjusting the chuck or installing accessories reduces accidental-start risk.
Using an Incompatible Battery
A battery should be designed for the drill’s battery system.
Do not force batteries from unrelated platforms into the tool.
Using the Wrong Mode
Hammer mode, clutch settings, and standard drilling mode serve different purposes.
Choose the mode based on the job.
Safety Tips Before Using an Assembled Drill
Before drilling, wear safety glasses to protect your eyes from chips and debris.
Tie back long hair and avoid loose clothing or jewelry around rotating tools.
Secure the workpiece instead of holding small pieces in your hand.
Check the drilling area for hidden electrical wires, plumbing, or other hazards before drilling into walls, floors, or ceilings.
Use both hands when a powerful drill or large bit produces significant torque.
If the drill has an auxiliary handle, use it for demanding applications.
Stop the drill before making adjustments.
FAQs About How to Assemble a Drill
Does a cordless drill need to be assembled when you buy it?
Usually only minor setup is required.
Most cordless drills arrive with the internal tool fully assembled. You generally need to install the battery, drill bit, and any removable accessories such as a side handle or belt hook.
Do I install the drill bit before the battery?
Yes. Installing the drill bit before connecting the battery is a safer practice because the drill cannot accidentally start while your hands are near the chuck.
How far should a drill bit go into the chuck?
Insert enough of the smooth shank for the chuck jaws to grip it securely.
Do not clamp the jaws directly onto the cutting flutes unless the bit design specifically requires it.
How do I know if the drill bit is installed correctly?
The bit should sit centered between the chuck jaws and rotate with little or no visible wobble.
If it appears crooked, remove and reinstall it.
Can I put any drill bit in any drill?
No.
The bit shank must fit the drill chuck, and the bit must be appropriate for the material and application.
Some rotary hammer bits and specialty bits require specific chuck systems that are different from standard drill chucks.
Should the drill be in forward or reverse for drilling?
Normal drilling generally uses the forward direction.
Reverse is typically used to remove screws or back a bit out when necessary.
Why does my drill stop when driving a screw?
The clutch setting may be too low.
Increase the clutch setting gradually until the drill provides enough torque to drive the screw to the required depth.
Do I need the side handle?
If the drill includes an auxiliary handle, using it can provide considerably better control during high-torque drilling.
It is particularly useful with large bits, hole saws, and hammer drilling.
Conclusion
Learning how to assemble a drill is mostly about preparing an already-built power tool for safe use. Begin with the battery removed or the power cord unplugged, attach any supplied side handle or depth stop, install the correct bit securely in the chuck, choose the appropriate direction, clutch, gear, and operating mode, and connect the power source only after the setup is complete.
Check that the bit is centered, the battery is locked in place, and all accessories are secure before starting your project. Most modern drills require only a few minutes of setup, but assembling those parts correctly gives you better control, cleaner drilling results, and a safer tool to work with.