How to Put Drill in Hammer Mode: 7 Steps for Brick and Concrete
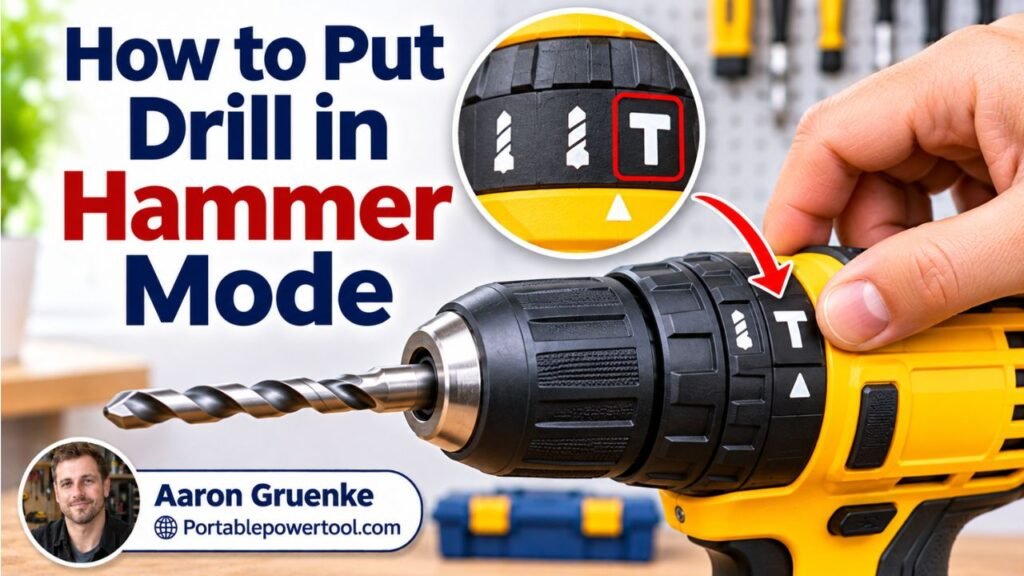
To put a drill in hammer mode, stop the motor completely and turn the mode selector to the hammer symbol. On most hammer drill/drivers, this symbol appears on a rotating collar near the chuck. Once selected, the drill combines normal rotation with rapid forward impacts to help the bit cut into concrete, brick, and other masonry materials.
The process takes only a few moments, but the controls aren’t identical on every drill. Some cordless models use a numbered adjustment ring with a separate hammer setting. Others have a dedicated switch on top or beside the motor housing.
Choosing the wrong mode can make drilling frustrating. A regular drilling setting may struggle with hard concrete, while hammer mode can damage wood, tile, or delicate surfaces. The drill bit matters just as much as the setting.
Whether you’re installing concrete anchors or mounting hardware on a brick wall, knowing how to change modes gives you better control. This guide explains where to find the hammer setting, how to activate it, which bits to use, and how to fix common mode-selector problems.
How to Put a Drill in Hammer Mode in 7 Steps
Putting a drill in hammer mode involves identifying the correct selector, stopping the tool, and aligning the hammer symbol with its indicator mark. You must also install a compatible masonry bit and choose suitable drilling settings. The exact controls vary by model, but the basic procedure remains similar.
Step 1: Confirm Your Drill Has Hammer Mode
Not every power drill includes a hammering function.
Start by examining the adjustment collar behind the chuck, which is the part holding the drill bit.
Look for a small hammer symbol.
Some drills also display the words “Hammer Drill” or “Hammer Drill/Driver” on the housing.
If you only find numbered clutch settings and a drill-bit symbol, your tool may not have hammer mode.
For more ways to identify the feature, read the guide on how to tell if a drill is a hammer drill.
Quick Check: Find the model number on the drill’s identification label and compare its operating modes with the owner’s manual.
Step 2: Turn Off the Drill Completely
Release the trigger and allow the chuck to stop spinning.
If the drill is cordless, engage the trigger lock or remove the battery according to the manufacturer’s instructions before handling the bit.
For a corded drill, unplug it before changing accessories.
Never switch operating modes while the motor is running.
Some models contain mechanical gears or selector parts that can suffer damage if moved during rotation.
Step 3: Find the Mode Selector
Most modern cordless hammer drill/drivers have an adjustment collar behind the chuck.
The collar may display:
- Numbers for screwdriving torque
- A drill-bit symbol for regular drilling
- A hammer symbol for hammer drilling
Other models use a sliding switch, rotating knob, or separate mode dial.
For example, a corded hammer drill may have a small selector on the upper housing instead of a numbered collar.
Find the indicator arrow or alignment mark before making adjustments.
Step 4: Install a Suitable Masonry Drill Bit
Choose a masonry bit designed for percussion drilling.
A carbide-tipped masonry bit has a hardened cutting tip that can break and remove concrete or brick particles during hammer drilling.
Make sure the bit fits your drill’s chuck and is rated for the material.
Install it securely while the tool is disconnected from power or locked against accidental startup.
Don’t use an ordinary wood bit or standard metal-drilling bit in hammer mode.
Those bits aren’t designed for repeated hammering impacts.
Step 5: Rotate the Selector to the Hammer Symbol
With the drill stopped, turn the mode selector until the hammer symbol aligns with the indicator mark.
You may feel a small click as the collar reaches the correct position.
Some models require you to press a release button before rotating the selector.
Don’t force it.
The hammer drill operating modes explain how switching between hammer and regular drilling supports different materials.
Important: The selector must rest fully in a valid operating position, not halfway between two symbols.
Step 6: Select the Correct Speed and Direction
Set the drill to forward rotation for ordinary masonry drilling.
On most drills, that means clockwise rotation when looking toward the screw or drill-bit tip.
If your tool has a two-speed gearbox, choose the range recommended for the bit size and material.
Some hammer drills use higher rotational speeds for small masonry holes. Larger bits may require lower speeds.
Don’t assume gear 2 is always correct.
Check the manufacturer’s drilling recommendations.
Step 7: Test the Hammer Action
Mark the hole location and confirm that drilling there won’t strike hidden wiring, pipes, or structural reinforcement.
Hold the drill firmly using the auxiliary handle when supplied or required.
Place the bit against the masonry and squeeze the trigger gently.
Apply steady pressure while keeping the drill straight.
You should hear and feel the hammering action once the bit contacts the material under load.
After finishing, release the trigger and let the motor stop.
Switch back to regular drill mode before working with wood, metal, or plastic.
Where Is the Hammer Mode Switch on Different Drills?
The hammer mode selector is usually near the front of a cordless drill or on the housing of a corded model. Some tools combine drilling and hammer settings on one collar, while others use separate controls. Rotary hammers often have a larger mode dial with additional chiseling positions.
| Drill Design | Selector Location | How to Activate Hammer Mode |
|---|---|---|
| Cordless hammer drill/driver | Collar behind chuck | Align hammer symbol with indicator |
| Corded hammer drill | Top or side of housing | Move switch to hammer setting |
| Multi-mode hammer drill | Separate mode selector | Rotate to hammer-drilling symbol |
| SDS rotary hammer | Large mode dial | Select combined rotation and hammering |
Cordless Hammer Drill/Drivers
A cordless hammer drill/driver often has a collar with several symbols.
Turn the collar until the hammer icon reaches the alignment mark.
Some designs use separate rings for clutch torque and operating mode.
For example, one ring may control screwdriving force while another selects drilling or hammer drilling.
Don’t confuse the two controls.
Corded Hammer Drills
Many corded hammer drills have a switch on the upper or side housing.
The switch generally moves between regular drilling and hammer drilling.
Unlike a cordless drill/driver, a corded hammer drill may not offer numbered screwdriving clutch settings.
Always follow the specific model’s switch markings.
Rotary Hammer Drills
A rotary hammer uses a stronger hammering mechanism and often includes several operating positions.
These may include drilling only, hammer drilling, and hammer-only chiseling.
For drilling concrete holes, select the mode that combines rotation with impacts.
The separate guide on how to use a rotary hammer drill explains its SDS bit system and operating controls.
What Does Hammer Mode Actually Do?
Hammer mode makes the drill bit rotate while delivering rapid impacts along the bit’s length. These small forward blows help break masonry particles as the rotating cutting edges remove them. The combined action makes drilling brick and concrete more effective than using rotation alone on a suitable hammer drill.
Regular Drilling vs. Hammer Drilling
| Feature | Regular Drill Mode | Hammer Drill Mode |
|---|---|---|
| Bit rotation | Yes | Yes |
| Forward hammer impacts | No | Yes |
| Wood drilling | Suitable | Not recommended |
| Metal drilling | Suitable | Not recommended |
| Brick drilling | Possible with suitable equipment | Generally better |
| Concrete drilling | Often slow or ineffective | Designed for suitable masonry work |
| Screwdriving | Possible with proper controls | Not suitable |
A standard drilling setting works by spinning cutting edges against the material.
Hammer drilling adds repeated forward impacts.
Think of tapping a small masonry chisel while turning it. The impacts help break the hard surface, and rotation clears material from the hole.
The explanation of hammer drill operation describes how the forward hammering action helps with masonry drilling.
Is Hammer Mode the Same as Hammer-Only Mode?
No.
Hammer-drilling mode combines rotation and impacts to make holes.
Hammer-only mode delivers impacts without continuous drilling rotation. It appears on certain rotary hammers designed for chiseling tasks.
For example, removing a small section of tile adhesive may require a suitable rotary hammer in chiseling mode.
Drilling a hole for a concrete anchor requires rotation and hammering together.
Using the wrong mode won’t produce the intended result.
When Should You Use Hammer Mode?
Use hammer mode for drilling suitable masonry materials, including concrete, brick, concrete block, and some stone. The hammering action helps the bit break through hard mineral surfaces. Turn it off for ordinary wood, metal, plastic, and drywall drilling because those materials generally need cutting without repeated impacts.
Best Materials for Hammer Drilling
| Material | Hammer Mode? | Recommendation |
|---|---|---|
| Concrete | Yes | Use a compatible masonry bit |
| Brick | Yes | Avoid excessive pressure |
| Concrete block | Yes | Control pressure on hollow sections |
| Mortar | Usually | Choose the correct anchor location |
| Natural stone | Depends | Match bit and tool to stone type |
| Wood | No | Use regular drill mode |
| Metal | No | Use regular drill mode |
| Plastic | No | Use regular drill mode |
| Ceramic tile | No | Use a tile-rated bit and appropriate technique |
| Drywall | No | Use regular drilling or hand tools |
Drilling Into Brick
Brick is a common material for hammer drilling.
Say you’re mounting a small exterior fixture on a brick wall.
After confirming the mounting location is safe, select a masonry bit sized according to the anchor manufacturer’s instructions.
Use hammer mode if the brick and tool are suitable.
Start with controlled pressure because some bricks can chip or crack.
The anchor’s instructions determine whether installation should be in the brick itself or a mortar joint.
Drilling Into Concrete
Concrete often requires more drilling effort than ordinary brick.
A standard hammer drill can handle some small anchor holes within its rated capacity.
For harder concrete, larger holes, or repeated drilling, an SDS rotary hammer may be the better tool.
Don’t force a small cordless hammer drill through material beyond its rated capacity.
That can overheat the tool or cause the bit to bind.
What Drill Bit and Speed Work Best in Hammer Mode?
Hammer drilling requires a compatible masonry bit and speed matched to the bit diameter, material, and drill specifications. Carbide-tipped bits are common for standard hammer drills, while SDS rotary hammers require appropriate SDS accessories. Start with controlled trigger pressure rather than immediately running at maximum speed.
Choosing a Masonry Bit
Check the chuck type before selecting the bit.
A standard three-jaw chuck usually accepts suitable round-shank or specially shaped masonry bits.
An SDS-Plus or SDS-Max chuck requires its corresponding bit system.
These systems aren’t interchangeable without approved accessories.
For example, a typical round-shank masonry bit doesn’t lock directly into an SDS-Plus holder.
Choosing the Speed Setting
Many cordless hammer drills offer two mechanical gear ranges.
| Setting | General Application |
|---|---|
| Low gear (1) | Larger bits or tasks requiring greater torque |
| High gear (2) | Smaller masonry bits where the manufacturer permits |
| Variable trigger | Starting holes and controlling progress |
| Forward rotation | Normal hammer drilling |
The best setting depends on the drill and bit.
A 1/4-inch masonry bit may have different speed requirements from a 1/2-inch bit.
Follow the manufacturer’s bit-size limits rather than guessing.
How Much Pressure Should You Apply?
Apply enough pressure to keep the masonry bit working without forcing the motor.
Too much pressure can slow rotation, overheat the bit, and increase the chance of binding.
Maintain a firm two-handed grip when using an auxiliary handle.
For deeper holes, follow the bit manufacturer’s instructions for clearing dust and keeping the bit from binding.
Pro Tip: Let the hammer action do the work. A steady drilling pace is better than pushing harder whenever progress slows.
Why Won’t My Drill Switch to Hammer Mode?
A drill may refuse to enter hammer mode because the selector is locked, the gearbox hasn’t fully stopped, or the tool doesn’t include a hammering function. Dust, damaged selector parts, and mechanical misalignment can also interfere with switching. Never force the collar or operate the drill between settings.
| Problem | Likely Cause | Safe Solution |
|---|---|---|
| No hammer symbol | Drill lacks hammer mode | Check model specifications |
| Selector won’t rotate | Locking button or mechanism | Follow release procedure |
| Selector feels stuck | Debris or internal fault | Stop and inspect externally |
| Hammer action won’t engage | Incomplete selector position | Reselect with motor stopped |
| Drill rotates without hammering | Incorrect mode or insufficient contact | Check selector and operating instructions |
| Loud grinding or unusual vibration | Possible mechanical damage | Stop using the drill |
The Selector Ring Is Stuck
First, stop the motor.
Disconnect the power source before inspecting the tool.
Check whether a release button must be pressed.
Some mode selectors require the internal mechanism to settle into a valid position.
Follow the manual if it describes a permitted method for aligning the mechanism.
Never use pliers to force the collar.
The Drill Spins but Doesn’t Hammer
Confirm that the hammer icon is fully aligned with the indicator.
Some hammering mechanisms engage only when the bit contacts the work surface under suitable pressure.
Don’t try to test the hammering mechanism by pressing a spinning bit against your hand or another unsafe surface.
If the hammer function still doesn’t operate under normal conditions, the mechanism may need professional service.
The Drill Doesn’t Have a Hammer Symbol
A standard drill/driver cannot gain hammer mode simply by installing a masonry bit.
Its internal hammering mechanism isn’t present.
A masonry bit may drill some softer masonry without percussion, but drilling hard concrete can be slow or impractical.
Use a proper hammer drill or rotary hammer when the job requires one.
Safety Checks Before Using Hammer Mode
Hammer drilling requires eye protection, controlled handling, and attention to hidden utilities and masonry dust. Concrete and brick can produce airborne particles, while a jammed bit can twist the drill unexpectedly. Suitable protective equipment and dust controls help reduce these risks during drilling.
Check for Hidden Wiring and Pipes
Before drilling into a wall, determine whether electrical wiring, plumbing, or gas lines might be present.
A wall scanner may help identify certain hidden objects, but it cannot detect every hazard.
Don’t rely on a scanner alone.
If you’re uncertain about what lies behind the drilling location, stop and consult a qualified professional.
Control Concrete and Masonry Dust
Drilling masonry can release fine dust containing respirable crystalline silica.
Breathing this dust over time can cause serious lung damage.
The guidance on controlling silica dust during drilling recommends suitable dust-collection systems for construction drilling operations.
Use an appropriate dust shroud and compatible extractor when required, and follow applicable safety requirements.
Don’t blow accumulated masonry dust into the air with compressed air.
Prevent Kickback and Bit Binding
Kickback occurs when the drill bit suddenly catches and the tool body twists against your hands.
Keep your footing stable and use the auxiliary handle when specified.
Avoid pressing sideways on the bit.
If the bit binds, release the trigger immediately.
Don’t keep forcing the motor while the drill is stalled.
Safety Note: Disconnect the drill from power before changing bits, removing jams, or making adjustments that require access to moving parts.
Frequently Asked Questions
Hammer drill controls vary between brands and models, but the basic operating principles remain the same. Most confusion involves finding the hammer icon, selecting the correct mode, and knowing which materials need percussion drilling. These answers address common questions before starting a masonry project.
What Symbol Is Hammer Mode on a Drill?
Hammer mode is usually represented by a small hammer icon on the selector collar or switch. Some rotary hammers show a hammer combined with a drill-bit symbol for hammer drilling. Align the correct symbol with the tool’s indicator mark after stopping the motor.
Can You Put a Regular Drill in Hammer Mode?
No. A regular drill without a hammering mechanism cannot be switched into hammer mode. Installing a masonry bit doesn’t create hammer action. Some standard drills can make small holes in softer masonry, but a hammer drill or rotary hammer is generally better for concrete.
Should a Hammer Drill Be on Setting 1 or 2?
The correct gear depends on the drill, bit size, and material. Low gear typically provides greater torque at slower speed, while high gear offers faster rotation. Many small masonry holes benefit from higher speed, but always follow the manufacturer’s recommended settings and drilling limits.
Do You Need Hammer Mode to Drill Brick?
Hammer mode is useful for drilling brick because the repeated impacts help break the masonry. Some softer bricks can be drilled with a suitable masonry bit in regular mode. For hard brick, hammer action generally makes drilling easier, provided the material and tool are compatible.
Can You Use Hammer Mode for Screws?
No. Hammer mode is designed for masonry drilling, not driving ordinary screws. The repeated impacts can damage fasteners, bits, and surrounding materials. Use the screwdriving mode with a suitable clutch setting instead. A powered impact driver uses a different impact mechanism and shouldn’t be confused with hammer drilling.
Why Does My Drill Make Noise in Hammer Mode?
Hammer mode creates repeated internal impacts, so a rattling or rapid tapping sound during drilling can be normal. The sound often becomes more noticeable when the bit contacts masonry. Grinding, irregular banging, or a sudden change in operation may indicate a problem that requires inspection.
Switch to Hammer Mode With Confidence
Putting a drill in hammer mode is straightforward once you know where the selector is located.
On most cordless hammer drill/drivers, rotate the adjustment collar until the hammer symbol aligns with the indicator mark. Corded models may use a separate switch, while rotary hammers often have a larger multi-position dial.
Always stop the motor before changing modes.
Choose a masonry bit compatible with your chuck, select the correct speed, and use steady pressure while drilling brick or concrete.
Remember that hammer mode isn’t suitable for ordinary screwdriving, wood, metal, or delicate tile surfaces.
If the selector won’t move or the hammer action fails to engage, check the manual rather than forcing the mechanism.
Your next step is to identify the hammer symbol on your drill and confirm its operating procedure in the owner’s manual. Once you’ve selected the correct bit and checked the drilling location, you can begin your masonry project with better control and fewer mistakes.