
How to Catch Dust When Drilling Ceiling Without Making a Mess
Drilling into a ceiling can create far more mess than drilling into a wall. Gravity sends drywall dust, plaster, wood dust, or masonry debris directly onto your face, tools, furniture, and floor.
Fortunately, learning how to catch dust when drilling ceiling holes does not require expensive equipment. A simple homemade dust catcher, a vacuum attachment, or even a disposable cup can collect most debris before it spreads around the room.
The best method depends on the ceiling material, the number of holes you need to drill, and how much dust the job produces. This guide explains the easiest methods, how to use them safely, and what to do when drilling materials that create hazardous fine dust.
How to Catch Dust When Drilling Ceiling Holes

The easiest way to catch dust when drilling a ceiling is to place a dust-catching container directly around the drill bit or use a vacuum nozzle beside the hole.
For small household jobs, a paper cup, plastic container, or commercial drill dust collector can work well. For larger jobs, especially concrete or masonry drilling, a shop vacuum with dust extraction is usually more effective.
The basic idea is simple: collect the dust at the point where it leaves the ceiling instead of cleaning it from the room afterward.
Common options include:
- A paper or plastic cup placed over the drill bit
- A folded paper dust catcher
- A plastic bottle or food container
- A vacuum cleaner nozzle held beside the drill bit
- A commercial drill dust collection attachment
- A hammer-drill dust extraction system
For one or two small drywall holes, the cup method is often enough. For repeated drilling or dusty masonry work, vacuum extraction is usually the better choice.
Use a Paper or Plastic Cup as a Drill Dust Catcher
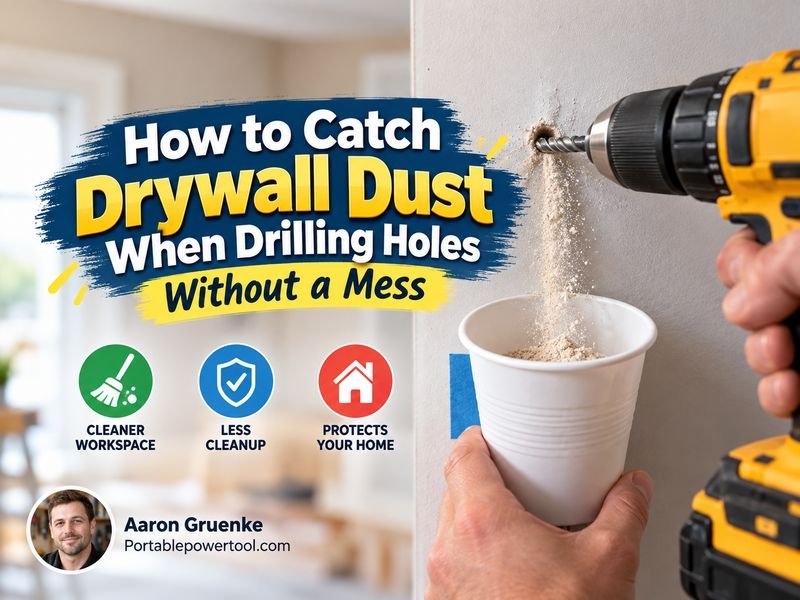
One of the simplest DIY methods is turning a disposable cup into a ceiling dust catcher.
A lightweight paper cup works especially well because it is easy to cut and flexible enough to sit against the ceiling.
How to Make the Dust Cup
You will need:
- A paper or thin plastic cup
- A drill
- The drill bit you plan to use
- Scissors or a utility knife if needed
Make a small hole in the center of the bottom of the cup. The hole should be only slightly larger than the drill bit.
Slide the drill bit through the hole so the open side of the cup faces the ceiling.
When you raise the drill, the rim of the cup should sit close to the ceiling surface.
How It Works
As the drill bit cuts into the ceiling, falling debris lands inside the cup instead of dropping onto you.
This method works particularly well for:
- Drywall
- Gypsum board
- Soft plaster
- Wood
- Small anchor holes
Keep the cup upright when lowering the drill so you do not accidentally dump the collected dust.
When a Cup May Not Work Well
A cup is less effective when drilling:
- Large holes
- Deep concrete holes
- Brick or masonry
- Multiple holes in succession
- Materials that create a large amount of fine airborne dust
For those jobs, vacuum extraction is usually more effective.
Hold a Vacuum Nozzle Beside the Drill Bit
A shop vacuum or household vacuum can capture dust while you drill.
Place the vacuum nozzle as close to the drill bit as practical without allowing the bit or chuck to touch it.
As drilling begins, the vacuum pulls loose particles away before they fall.
This approach works well when another person can hold the vacuum hose.
If you are working alone, you may be able to temporarily secure the hose close to the drilling location, provided it does not interfere with the drill or create a falling hazard.
Why Vacuum Extraction Works Well
A vacuum can catch both:
- Larger falling particles
- Fine airborne dust
That makes vacuum extraction particularly useful for plaster, concrete, brick, and similar materials.
For very fine construction dust, use a vacuum and filter designed for that type of debris. Ordinary household vacuums may allow some fine particles to pass through the filter or may not be designed for heavy construction dust.
Make a Simple Paper Dust Catcher
If you do not have a cup available, a sheet of paper can catch light drilling dust.
Fold a stiff piece of paper or thin cardboard into a shallow tray or envelope shape. Position it directly below the drilling point.
This method is useful when drilling a wall, but it can also help with ceilings if the paper can be secured properly.
For ceiling work, however, a cup surrounding the bit generally catches dust more reliably because the dust falls straight down.
Use a Plastic Bottle as a Dust Collector
A small plastic bottle can also be converted into a reusable dust-catching container.
Cut away part of the bottle so it forms a shallow container. Make a small opening for the drill bit and position the container around the drilling area.
A transparent bottle has one advantage: you can often see how much debris has accumulated.
Make sure any cut plastic edges are smooth enough that they will not scratch the ceiling or your hands.
Use a Commercial Drill Dust Collector
Commercial dust collectors are designed specifically for catching debris while drilling.
Some models look like small cups that surround the drill bit. Others attach to a vacuum and stick against the drilling surface through suction.
These tools can be helpful if you regularly install:
- Ceiling anchors
- Light fixtures
- Shelving
- Smoke detectors
- Curtain hardware
- Electrical fixtures
- Mounting brackets
A reusable collector may also be more convenient than making a new DIY catcher every time you drill.
Vacuum-Powered Dust Collectors
Some drilling dust collectors connect directly to a shop vacuum.
The collector sits against the ceiling while the vacuum creates suction. Dust is immediately drawn into the vacuum as the drill operates.
Because the collector may hold itself against the surface, this setup can make overhead drilling easier when working alone.
Catching Dust When Drilling Drywall Ceilings
Drywall produces a light, powdery dust that easily spreads through a room.
For a few small holes, a paper cup around the drill bit is usually effective.
Use moderate drill speed and avoid forcing the bit. Excessive pressure can break away more drywall than necessary.
If you are installing a drywall anchor, choose the correct drill-bit diameter for the anchor. Oversized holes create unnecessary debris and may prevent the anchor from gripping properly.
After drilling, remove loose dust from the hole before installing the anchor.
A vacuum nozzle works well for this.
Catching Dust When Drilling Plaster Ceilings
Older homes may have plaster ceilings, sometimes installed over wood lath or other backing materials.
Plaster tends to be harder and more brittle than drywall. Drilling can create both fine dust and small chips.
A deeper cup or vacuum system generally works better than a shallow dust catcher.
Start drilling carefully rather than immediately applying heavy pressure. This can help reduce cracking and prevent large pieces of plaster from breaking loose around the hole.
Older ceiling systems can also contain multiple layers, so the material behind the visible surface may differ from modern drywall construction.
Catching Dust When Drilling Concrete or Masonry Ceilings
Concrete drilling creates significantly more fine dust than drywall drilling.
For this type of work, a basic paper cup may catch the larger debris, but it will not necessarily capture all fine airborne dust.
A dust extraction system or shop vacuum positioned directly at the drilling point is a better approach.
Concrete, brick, mortar, and similar masonry materials can contain crystalline silica. Drilling these materials can release very fine respirable dust.
Because of that, dust control is not just about keeping the room clean.
Use appropriate dust extraction and respiratory protection when needed, especially during repeated or prolonged masonry drilling.
For frequent professional work, use equipment designed specifically for dust-controlled drilling.
Make a Better DIY Dust Catcher With a Food Container
If you need something sturdier than a paper cup, a small lightweight food container can work.
Choose a container wide enough to catch falling debris but light enough to hold comfortably against the ceiling.
Make a hole in the bottom just large enough for the drill bit.
Insert the bit and drill normally.
A wider container can catch more debris than a cup, making this useful for slightly larger drilling jobs.
Avoid using rigid containers that block your view or interfere with safe drill positioning.
Use a Dust Extraction Drill Attachment
Some drills and rotary hammers can use dedicated dust extraction attachments.
These attachments often surround the drill bit and capture dust directly at the hole.
Depending on the system, the dust may be:
- Collected in an onboard container
- Sent through a hose to a vacuum
- Captured through a separate suction attachment
These systems are particularly useful when drilling many holes.
They can also improve visibility because less debris falls between the drill and the work surface.
Prepare the Room Before Drilling
Even a good dust catcher may not capture every particle.
Before drilling overhead, move or cover anything directly below the work area.
Consider protecting:
- Furniture
- Electronics
- Beds
- Countertops
- Carpet
- HVAC vents
A small drop cloth or plastic sheet under the drilling location can catch anything the dust collector misses.
For a single small hole, this may seem unnecessary, but ceiling dust can spread surprisingly far when the drill bit spins.
Wear Eye Protection When Drilling Overhead
Eye protection is especially important when drilling ceilings because debris naturally falls toward your face.
Wear properly fitting safety glasses or goggles.
Ordinary prescription glasses do not provide the same level of protection as safety eyewear.
If the material creates significant airborne dust, appropriate respiratory protection may also be necessary.
Keep your face slightly to the side rather than directly below the drill whenever possible.
Check for Wires, Pipes, and Other Hidden Hazards
Dust is not the only concern when drilling into a ceiling.
Before drilling, consider what may be hidden above the surface.
Depending on the building, the area may contain:
- Electrical wiring
- Water pipes
- HVAC ducts
- Joists
- Metal framing
- Fire sprinkler lines
Be especially cautious near ceiling lights, electrical fixtures, bathrooms, kitchens, and utility areas.
If you are unsure what is behind the ceiling, use an appropriate detector or choose another mounting location.
Do not continue drilling if you unexpectedly hit metal or another material you cannot identify.
Use the Correct Drill Bit
The correct bit reduces both drilling difficulty and unnecessary dust.
Common examples include:
- Twist drill bit for wood or some general-purpose applications
- Masonry bit for brick, concrete, or block
- Spade or hole saw for larger openings in suitable materials
- Specialized bits for tile, metal, or other surfaces
Using the wrong bit can cause excessive heat, slow drilling, damaged surfaces, or unnecessary debris.
Match the bit to both the ceiling material and the fastener you plan to install.
Drill at a Controlled Speed
Running the drill at maximum speed is not always necessary.
For many small household holes, steady drilling at a controlled speed provides better control.
Avoid pushing aggressively.
Let the drill bit do the cutting.
Too much pressure can:
- Damage drywall
- Crack plaster
- Make the drill harder to control
- Increase debris
- Cause the bit to bind
Overhead drilling also becomes tiring quickly, so proper positioning matters.
How to Keep Dust From Escaping Around the Cup
A DIY cup works best when the rim stays close to the ceiling.
However, do not press so hard that the cup blocks your view or forces the drill out of alignment.
Using a flexible paper cup allows the rim to gently conform to the ceiling.
If the ceiling is textured, some dust may escape through the gaps.
In that situation, vacuum extraction may work better.
You can also use a slightly wider cup so escaping particles are more likely to fall inside it.
How to Empty the Dust Catcher Without Making a Mess
The drilling may be clean, but you can still create a mess when removing the tool.
Once the hole is complete:
- Stop the drill completely.
- Keep the drill and dust catcher upright.
- Slowly lower the drill away from the ceiling.
- Remove the dust cup carefully.
- Empty it directly into a trash container.
Do not immediately tilt the drill sideways.
Fine powder can easily spill from the cup.
If you are drilling several holes, empty the cup regularly so it does not become too full.
Common Mistakes to Avoid
Several small mistakes can defeat the purpose of using a dust catcher.
Making the Hole in the Cup Too Large
If the opening around the bit is too wide, debris can fall through.
Make the opening only large enough for the bit to rotate freely.
Using a Very Shallow Container
A shallow catcher may overflow quickly.
Use a deeper cup when drilling plaster or masonry.
Drilling Too Aggressively
Excessive speed and pressure can throw dust beyond the catcher.
Use steady, controlled drilling.
Forgetting Eye Protection
A dust cup reduces debris but does not guarantee that nothing will fall.
Always protect your eyes during overhead drilling.
Using a Household Vacuum for Heavy Construction Dust
Some household vacuums are not designed for large quantities of fine construction dust.
Use appropriate equipment for larger renovation jobs.
Best Method for Different Ceiling Materials
| Ceiling Material | Practical Dust-Catching Method | Typical Dust Level |
| Drywall | Paper cup or vacuum nozzle | Low to moderate |
| Plaster | Deep cup plus vacuum | Moderate |
| Wood | Cup or vacuum | Low to moderate |
| Concrete | Vacuum dust extraction | High |
| Brick or masonry | Vacuum extraction system | High |
| Textured ceiling | Wide catcher or vacuum | Moderate |
The size of the job also matters.
A paper cup may be perfectly adequate for one drywall anchor but inefficient for drilling dozens of concrete holes.
When Professional Help May Be Better
Most small ceiling holes can be drilled safely with ordinary DIY tools.
Professional help may be worth considering if:
- You cannot determine what is behind the ceiling.
- The drilling location is close to electrical or plumbing systems.
- You need many deep holes in reinforced concrete.
- The ceiling contains an unfamiliar material.
- You suspect hazardous materials may be present.
- The job requires working from a tall ladder or difficult position.
Older ceiling materials can require additional caution. If you suspect asbestos-containing material or another hazardous substance, avoid disturbing it until the material has been properly assessed.
FAQs About How to Catch Dust When Drilling Ceiling
What is the easiest way to catch ceiling dust while drilling?
For one or two small holes, the easiest method is usually to slide a paper cup over the drill bit so the cup rests beneath the drilling point.
The cup catches most falling drywall or plaster dust.
Can I use a vacuum while drilling a ceiling?
Yes. Holding a vacuum nozzle close to the hole can capture dust as it is produced.
A shop vacuum or purpose-built dust extraction system is especially useful for masonry or repeated drilling.
How do you make a drill dust catcher from a cup?
Make a small hole in the bottom of a paper or plastic cup and push the drill bit through it.
Position the open end of the cup toward the ceiling. The debris falls into the cup while you drill.
How do I stop drywall dust from falling in my eyes?
Wear safety glasses or goggles and use a dust catcher around the drill bit.
Try to keep your face slightly away from the direct path beneath the hole.
What should I use when drilling concrete overhead?
A vacuum-based dust extraction system is generally more suitable for concrete because concrete drilling can produce large amounts of very fine dust.
Use a proper masonry bit and appropriate protective equipment.
Can I tape a vacuum hose to the ceiling?
It may be possible in some situations, but the hose must be securely supported and positioned so it cannot fall, interfere with the drill, or damage the ceiling.
A purpose-built vacuum drilling attachment is generally easier to control.
Does a paper cup catch all drilling dust?
No. A paper cup catches much of the falling debris, but very fine airborne particles can still escape.
Vacuum extraction provides better control when fine dust is a concern.
Should I clean dust from the hole before inserting an anchor?
Yes. Loose debris can interfere with some anchors and fasteners.
Use a vacuum, brush, or another suitable cleaning method before installing the fastener.
Conclusion
Learning how to catch dust when drilling ceiling holes can make a small DIY job much cleaner and easier. For basic drywall or plaster drilling, a simple paper cup around the drill bit often catches most falling debris.
For larger jobs, repeated drilling, or concrete and masonry work, vacuum-based dust extraction is usually more effective because it captures both larger particles and fine dust.
Whichever method you use, combine good dust control with proper eye protection, the correct drill bit, controlled drilling pressure, and awareness of hidden wiring or pipes above the ceiling.